
Quick Beginnings
To install DB2 products for Windows 95 or Windows NT, from
a code server hard disk or CD-ROM to local or remote workstations, perform the
steps in the following sections:
You can also use this procedure to perform an interactive remote
install instead of an unattended remote one. Follow the instructions
below.
Read and perform the steps in this section before you begin the
installation to ensure that you have the required items and information you
will need.
This section describes usernames required to install the
DB2 product and its components.
- Windows 95
- The username must be a valid DB2 username.
A valid DB2 username is eight characters or less, and complies with
DB2's naming rules. For more information on DB2's naming
rules, see Appendix D. "Naming Rules".
- Windows NT
- You need to have a username that will be used to install DB2. The
username must belong to the Administrators group, and also be a valid DB2
username or have the "Act as part of the operating system" advanced
user right.
A valid DB2 username is eight characters or less, and complies with
DB2's naming rules. For more information on DB2's naming
rules, see Appendix D. "Naming Rules".
If this username does not comply with DB2's naming rules, but has the
"Act as part of the operating system" advanced user right, the
setup program will create the username DB2ADMIN to perform the
installation.
| Note: | This section only applies to Windows NT.
|
During installation, you will be asked to provide a username and password
that will be used by the Administration Server to log on to the system and to
start itself as a service.
By default, for installs using a response file, the setup program will set
the parameters ADMIN.USERID to DB2ADMIN and
ADMIN.PASSWORD to DB2ADMIN.
ADMIN.USERID is used to specify the username for Windows
NT. You can accept these default values, or provide your own. If
you provide your own ADMIN.USERID, you must ensure that it is
eight characters or less, and complies with DB2's naming rules.
For more information, see Appendix D. "Naming Rules".
The setup program will check to see if the username specified for the
Administration Server exists; if it does not, it will be created. If it
does exist, the setup program will:
- Verify that the username is a member of the Administrators group.
- Verify that the password is valid; provided that the username used to
install DB2 has the "Act as part of the operating system" advanced
user right.

|
If you use the default username db2admin, and did not change the
default password for this username, you should change this password
immediately following the installation.
When the setup program creates the db2admin username, it also
makes it a member of the Administrators group. Since its password is
well known, you should do the following:
- Change the password for db2admin, using the User Manager
function of Administration Tools.
- Change the password for the DB2-DB2DAS00 service to match the
new password that you specified for the db2admin username.
|
To make the DB2 install files accessible to the machine
where DB2 will be installed:
- If performing remote installs directly from the CD-ROM:
- Insert the appropriate CD-ROM into the drive.
- Ensure that the CD-ROM will remain in the drive for as long as it is
needed for the install. If the drive is often used for other tasks as
well, consider installing from the code server hard disk instead.
- If installing from a code server, you must copy the required files from
the CD-ROM directories to the code server's hard disk:
- Insert the appropriate CD-ROM into the drive.
- Create a directory on the code server, for example,
q:\db2prods.
- At the command prompt, use the cpysetup.bat command to
copy the files necessary for a particular language install to a code
server.
The command syntax is:
- x:\db2\winnt95\common\cpysetup.bat
q:\db2prods language
for:
- DB2 Client Application Enabler
- DB2 Connect Enterprise Edition
where:
- x is the letter that designates your CD-ROM drive
- q is the letter that designates the code server's
disk.
- language is the two-character country code that represents your
language (for example, EN for English). Table 47
If performing a remote installation, you must enable your network clients
to access the DB2 install files.
Grant shared access to the directory that you just created, or
to the CD-ROM drive.
To set up a share:
- Click on Start and select Programs->Windows
Explorer.
- Select the directory that you want to share, for example
q:\db2prods.
- Select Files->Properties from the menu bar.
The properties window for the directory will open. Click on the
Sharing tab.
- Select the Shared As radio button.
- In the Share Name field type a share name. For example,
type db2nt.
- To specify read access for everyone on Windows NT:
- Select the Permissions push button. The Access Through
Share Permissions window opens.
- In the Name box, make sure that Everyone is
selected.
- In the Type of Access box, select Read.
- Click on OK.
On Windows 95, you do not need to specify type of access when you set up a
share. By default, everyone is allowed read access.
In our example scenario, q:\db2prods uses a share name of
db2nt. We will use this value in the examples that
follow.
During an interactive installation, you provide the information needed to
install DB2 and configure its environment. During an unattended
installation, this information is provided as keywords and values in a
response file. DB2's install package includes a number of
ready-to-use sample response files, with default entries already in
place.
The sample response files are located
- x:\db2\winnt95\common
for:
- DB2 Client Application Enabler
- DB2 Connect Enterprise Edition
where x is the letter that designates the CD-ROM drive.
There is a different response file for each product on the CD, so that the
user has a valid list of parameters for each product.
Edit the sample response file using your favorite editor. For
example, you can use Notepad or WordPad.
- Open the sample response file for the package you want to install.
- db2cae.rsp for DB2 Client Application Enabler
- db2conen.rsp for DB2 Connect Enterprise Edition
- The response file contains:
- Keywords unique to installation
- Registry value/environment variable settings
- Database manager configuration parameter settings.
|
For more information on:
|
- To activate an item in the response file, remove the asterisk (*)
to the left of the keyword/registry value, erase the current setting to the
right of the value and type in a new setting. The possible settings are
listed to the right of the current setting.
An example section of a response file appears below:
...
FILE               = c:\sqllib
REBOOT             = No
*COMP              = Control Center
...
Keywords unique to installation are parameters that are only specified in a
response file during an unattended installation. The following is a
list of keywords unique to installation for Windows 95 and Windows NT
unattended installation:
- FILE
Specifies the destination directory for DB2.
| Note: | Check the value for the FILE keyword. FILE specifies
where to install the product. If you do not change this value, it
defaults to x:\sqllib where x is the drive on which your
operating system is installed.
|
- REBOOT
Specifies whether to reboot the system following installation.
- TYPE
Specifies the type of install. The options are:
- 0=Compact
- 1=Typical (default)
- 2=Custom
For 0 and 1 (compact and typical), any COMP value
will be ignored.
For all types, default communication values will be used where applicable,
as follows:
- DB2.DB2COMM and ADMIN.DB2COMM will be
set for the protocols detected on your system.
- If a protocol is detected on the system, or if you have specified values
for DB2.DB2COMM or ADMIN.DB2COMM, values
for its parameters will be generated so that the protocol will be enabled for
DB2's use at the end of the install. Checks are made to ensure
that the generated values are not duplicates, and that they conform to the
protocols set up on your system. Default values will be generated for
the following:
- For NetBIOS:
   DB2.DB2NBADAPTERS     ADMIN.DB2NBADAPTERS
   DB2.NNAME             ADMIN.NNAME
- For TCP/IP:
   DB2.PORTNUMBER        ADMIN.PORTNUMBER
   DB2.SVCENAME          ADMIN.SVCENAME
- For IPX/SPX:
   DB2.FILESERVER        ADMIN.FILESERVER
   DB2.OBJECTNAME        ADMIN.OBJECTNAME
   DB2.IPX_SOCKET        ADMIN.IPX_SOCKET
- For APPC:
DB2.TPNAME ADMIN.TPNAME
| Note: | You may override these values; however, if the associated protocol has not
been detected or specified, the values will not be used.
|
- PROD
Specifies the product you want installed. The options are:
- DB2_CAE for DB2 Client Application Enabler
- CONNECT_ENTERPRISE for DB2 Connect Enterprise Edition
| Note: | This parameter can be used more than once.
|
- COMP
Specifies the components you want installed. Components required for
a product are installed automatically. Components that are not
available are ignored.
| Note: | Component selections have no effect unless you specify a custom
installation.
|
The following table lists COMP keywords and the components they
represent.
Table 41. Component Keywords for Windows 95 and Windows NT Unattended Install
| Keyword
| Component
|
| Product Components
|
| GRAPHICAL_TOOLS
| Graphical Tools
|
| CLIENT_CONFIGURATION_ASSISTANT
| Client Configuration Assistant
|
| CONTROL_CENTER
| Control Center
|
| PERFORMANCE_MONITOR
| Performance Monitor
|
| VISUAL_EXPLAIN
| Visual Explain
|
| ODBC-DRIVER
| DB2 ODBC Driver
|
| SAMPLE_APPLICATIONS
| Sample Applications
|
| CONNECT_SUPPORT
| Connect Support
|
| SNA_SUPPORT
| Integrated SNA Support
|
| JAPANESE_CONVERSION
| Japanese Conversion Support
|
| KOREAN_CONVERSION
| Korean Conversion Support
|
| T_CHINESE_CONVERSION
| Traditional Chinese Conversion Support
|
| S_CHINESE_CONVERSION
| Simplified Chinese Conversion Support
|
| DB2 Books
|
| API_REFERENCE
| API Reference
|
| ADMINISTRATION_GUIDE
| Administration Guide
|
| ADMINISTRATION_GETTING_STARTED
| Administration Getting Started
|
| DB2_PROGRAMMING_GETTING_STARTED
| Road Map to DB2 Programming
|
| BUILDING_OS2_WIN_APPLICATIONS
| Building Applications for Windows and OS/2 Environments
|
| CLI_GUIDE_REFERENCE
| CLI Guide and Reference
|
| COMMAND_REFERENCE
| Command Reference
|
| CONNECT_PERSONAL_QUICK
| DB2 Connect Personal Edition Quick Beginnings
|
| CONNECT_USERS_GUIDE
| DB2 Connect User's Guide
|
| UNIVERSAL_DB_QUICK
| DB2 Universal Database Quick Beginnings
|
| SQL_PROGRAMMING_GUIDE
| Embedded SQL Programming Guide
|
| GLOSSARY
| Glossary
|
| MASTER_INDEX
| Master Index
|
| MESSAGES_REFERENCE
| Message Reference
|
| SQL_GETTING_STARTED
| SQL Getting Started
|
| SQL_REFERENCE
| SQL Reference
|
| SYSTEM_MONITOR_GUIDE
| System Monitor Guide and Reference
|
| CONNECT_ENTERPRISE_QUICK
| DB2 Connect Enterprise Edition Quick Beginnings
|
| TROUBLE_SHOOTING_GUIDE
| Troubleshooting Guide
|
| CONNECTIVITY_SUPPLEMENT
| DB2 Connectivity Supplement
|
| UNIVERSAL_DB_PERSONAL_QUICK
| DB2 Universal Database Personal Edition Quick Beginnings
|
| REPLICATION-GUIDE
| Replication Guide and Reference
|
| INSTALLING_CONFIGURING_CLIENTS
| Installing and Configuring DB2 Clients
|
- AUTO_CTRL_CENTER
Specifies whether or not to automatically start the Control Center each
time the system is rebooted.
| Note: | By default the Control Center will be automatically started unless this
parameter is set to NO.
|
- DB2.AUTOSTART
Specifies whether or not to automatically start the DB2 instance each time
the system is rebooted.
| Note: | By default the DB2 instance will be automatically started unless this
parameter is set to NO.
|
- AUTOSTART_CCA
Specifies whether or not to automatically start the Client Configuration
Assistant each time the system is rebooted.
| Note: | By default the Client Configuration Assistant will be automatically started
unless this parameter is set to NO.
|
- ADMIN.USERID
Specifies the username that the DB2 Administration Server will use to log
on to the system. If ADMIN.USERID is not activated, the
account DB2ADMIN/DB2ADMIN will be created and used, if
applicable. See "Determining the Username for the Administration Server When Using a Response File:"
- ADMIN.PASSWORD
Specifies the password for the DB2 Administration Server.
|
- Install DB2 products only on a drive which is local to the target
workstation. Installing on a non-local drive can cause performance and
availability problems.
- By default, the name of the response file will be used to determine the
products to be installed. You can override this setting by providing
one or more
PROD parameter values in the response file.
|
- Exit the file. If you have made any changes, save the file under a
new file name to preserve the original sample response file.
If you are installing directly from the CD-ROM, you must store the renamed
response file on another drive.
To perform the installation:
- At the workstation where DB2 will be installed, logon as a username that
meets the requirements for installing DB2. See "Creating Usernames for DB2 Installation and Operation" for more information.
- If performing a remote install, connect to the shared directory of the
code server hard disk, or to the CD-ROM drive, using a command similar to the
following:
net use e: \\machine\directory
where:
- e is the drive letter used to connect to the shared directory on
the server's hard disk or CD-ROM drive.
- machine is the machine name of the code server.
- directory is the share name of the code server or CD-ROM
drive.
For example, type:
net use e: \\codeserv\db2nt
Based on the example set up in previous steps, this points to
q:\db2prods on the code server.
- Run the setup program:
- Click on Start and select Run.
- In the Open Window, type the path to the setup program. The path
accepts the following command line arguments:
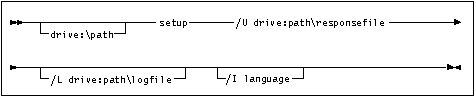
Specify the fully qualified path to invoke the program. For
example:
e:\setup /U d:\db2\common\db2setup.rsp /L db2log.log /I language
where:
- /U
- Specifies the fully qualified response file name. If you changed
and renamed the sample response file provided, make sure this parameter
matches the new name.
- /L
- Specifies the fully qualified log file name, where setup information and
any errors occurring during setup are logged.
If you do not specify the log file's name, DB2 names it
db2.log, and stores it in a directory called db2log, on the drive on
which your operating system is installed.
- /I
- Specifies the two-character country code that represents your language
(for example, EN for English). Table 47 lists the code for each available language.
If you do not specify the language, setup will determine the system
language, and launch the appropriate DB2 install for that language.
- Click on OK to start the setup program.
- The installation proceeds without further action on your part.
- Check the messages in the log file when the installation finishes.
|
For information on errors encountered during product installation, see the
db2.log file. The db2.log file stores general information
and error messages resulting from installation and uninstall
activities. By default, the db2.log is located in the
x:\db2log directory; where x: is the drive on which your operating
system is installed.
|
- Following installation, you must reboot the workstation before using
DB2.
| Note: | If you specified REBOOT=yes in your response file, the
workstation will reboot automatically.
|
| If you are installing a server and used the default username
DB2ADMIN, remember to change the default password for this
username. You should change this password immediately following
installation.
|
[ Top of Page | Previous Page | Next Page | Table of Contents | Index ]
[ DB2 List of Books |
Search the DB2 Books ]
