
Quick Beginnings
To configure the IBM Communications Server for Windows NT SNA Client,
at the client workstation click on the Start button, then select
Programs->IBM Communications Server SNA
Client->Configuration. The Configuration File
(*.ini) - CS/NT SNA Client Configuration window appears.
To configure the client workstation, you need to configure the following
options:
After each step, you return to the CS/NT SNA Client Configuration
window.
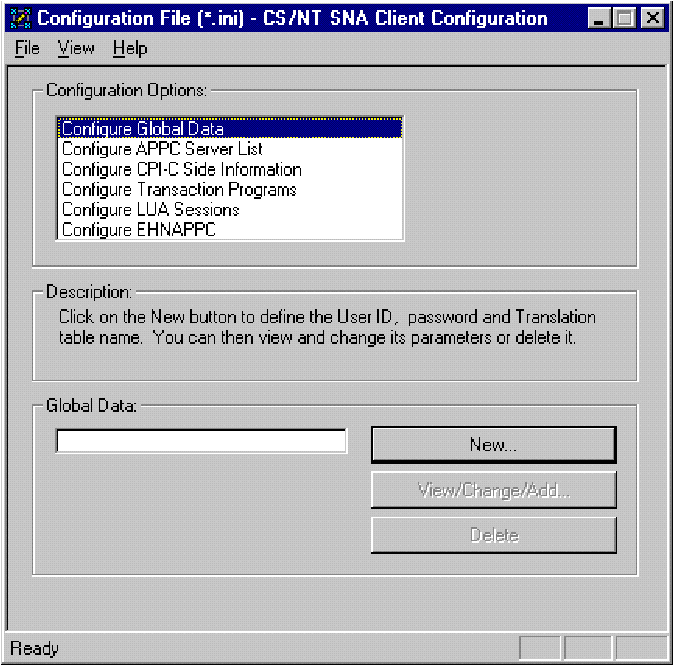
To configure the global data:
- In the Configuration options field, select Configure
Global Data, then click on the New button. The Define
Global Data window appears.
- In the User name field, type in the name (22) from the
worksheet (CSNTUS1). This is the user name that was defined
in "Step 2. Create a User Name on the Communications Server for Windows NT Server".
- In the Password and Confirm Password fields, type in
the password (23) that was defined in "Step 2. Create a User Name on the Communications Server for Windows NT Server".
- Click on OK.
To configure the APPC Server list:
- In the Configuration options field, select Configure APPC
Server List, then click on the New button. The Define
APPC Server list window appears.
- Type in the IP address (24) of the server
(123.123.123.123).
- Click on OK.
To configure the CPI-C side information:
- In the Configuration options field, select Configure CPI-C
side information, then click on the New button. The
Define CPI-C side information window appears.
- In the Symbolic destination name field, type in the name
(16) from the worksheet (DB2CPIC).
- In the Local LU alias field, type in the name (12) from
the worksheet (NYX1GW01).
| Note: | Ensure that this Transaction Program has a check mark in the For SNA API
Client use check box.
|
- In the Mode name field, type in the name (15) from the
worksheet (IBMRDB).
- In the TP name field, type in the name (17) from the
worksheet (DB2DRDA).
- In the Partner LU name field, type in the network ID (3)
and the partner LU name (2) from the worksheet
(SPIFNET.NYM2DB2), or type in the Partner LU
alias.
- Click on OK.
To configure a transaction program:
- In the Configuration options field, select Configure
Transaction Programs, then click on the New button.
The Define a Transaction Program window appears.
- In the Transaction Program field, type in the name (17)
from the worksheet (DB2DRDA).
- In the Local LU alias field, type in (12) from the
worksheet (NYX1GW01).
- If the Transaction Program you specified is a service TP, ensure that
there is a check mark in the Service TP check box. The
example TP DB2DRDA is not a service TP.
- Ensure that there is no check mark in the Attach Manager
started check box.
- Click on OK.
To save the configuration:
- From the File button on the menu bar, select Save
As. The Save As window appears.
- Type in a file name, then click on Save.
[ Top of Page | Previous Page | Next Page | Table of Contents | Index ]
[ DB2 List of Books |
Search the DB2 Books ]