Administration Guide
When using multiple databases in a single transaction, the requirements for
setting up and administering your environment are different, depending on the
number of databases that are being updated in the transaction. For more
information, see:
If your data is distributed across multiple databases, you may wish to
update one database while reading from one or more other databases. This type
of access can be performed within a single unit of work (transaction). This
type of database access is called distributed unit of work. See "Updating Multiple Databases" for another example of distributed unit of work.
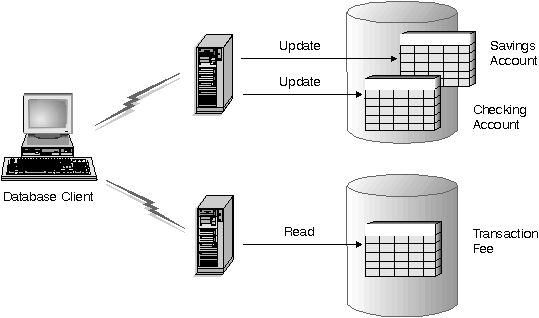
Figure 34. Using Multiple Databases in a Single Transaction
Figure 34 shows an example of a database client running a funds transfer application
that accesses two database servers: one containing the checking and
savings accounts and another containing the banking fee schedule. This example
is similar to the example provided in "Using a Single Database in a Transaction", except for the number of databases and the location of the tables. As
discussed previously, the application performing the transfer includes the
following steps:
- Accept the amount to transfer from the user interface
- Subtract the amount from the savings account and determine the new balance
- Read the fee schedule to determine the transaction fee for a savings
account with the given balance
- Subtract the transaction fee from the savings account
- Add the amount of the transfer to the checking account
- Commit the transaction (unit of work).
To set up the above environment, you must:
- Create the necessary tables in the appropriate databases (Chapter 3. "Implementing Your Design")
- (If physically remote...) Set up the database servers to use the
appropriate communications protocols, as described in the Quick Beginnings manuals
- (If physically remote...) Catalog the nodes and databases to identify the
databases on the above database servers, as described in the Quick Beginnings manuals
- Pre-compile your application program, as described in the Embedded SQL Programming Guide to specify:
- A type 2 connection, that is, specify CONNECT(2) on the PREP command
- One-phase commit, that is SYNCPOINT(ONEPHASE) on the PREP command.
Performance Tip: You should note that unlike the scenario
described in "Updating Multiple Databases" updating a single database while reading multiple databases only requires a
one-phase commit (SYNCPOINT(ONEPHASE) on PREP command). Using a one-phase
commit process requires less overhead than a two-phase commit process.
Therefore, performance is better when using SYNCPOINT(ONEPHASE) rather than
SYNCPOINT(TWOPHASE) for applications that only update a single database within
a unit of work.
DRDA Application Server Additional Information:
- If the databases containing the tables used in the above example are
located on DB2 for MVS/ESA, OS/390, OS/400, VM or VSE host systems, then the
DB2 Connect product is needed. See the DB2 Connect
User's Guide for additional information on how to set up and use DB2 Connect.
- Chapter 8. "Using DB2 with an XA-Compliant Transaction Manager" provides information about using your database in an environment with a
transaction processing monitor, such as CICS.
If your data is distributed across multiple databases, you may also wish to
read and update several databases in a single transaction. This type of
database access is called distributed unit of work. This type of
environment is more complex than that described in "Updating a Single Database". As a result, additional topics will be introduced below.
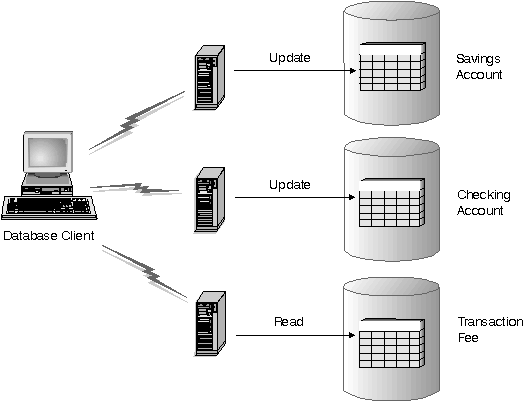
Figure 35. Updating Multiple Databases
Figure 35 shows an example similar to Figure 34, except the checking and savings accounts are located in different
databases. The application performing the transfer includes the same steps as
described in "Updating a Single Database".
- Accept the amount to transfer from the user interface
- Subtract the amount from the savings account and determine the new balance
- Read the fee schedule to determine the transaction fee for a savings
account with the given balance
- Subtract the transaction fee from the savings account
- Add the amount of the transfer to the checking account
- Commit the transaction (unit of work).
To set up the above environment, you must:
- Create the necessary tables in the appropriate databases (Chapter 3. "Implementing Your Design")
- (If physically remote...) Set up the database servers to use the
appropriate communications protocols, as described in the Quick Beginnings manuals
- (If physically remote...) Catalog the nodes and databases to identify the
databases on the above database servers, as described in the Quick Beginnings manuals
- Pre-compile your application program, as described in the Embedded SQL Programming Guide to specify:
- A type 2 connection, that is, specify CONNECT(2) on the PREP command
- Two-phase commit, that is SYNCPOINT(TWOPHASE) on the PREP command.
- Configure the DB2 transaction manager (TM), as described in "Using the DB2 Transaction Manager". This section also provides information about how the two-phase commit
process works.
The database manager provides transaction manager functions that can be used
to coordinate updating several databases within a single unit of work. The
database client automatically coordinates the unit of work and uses a
transaction manager database to register each transaction (unit of
work) and to track the completion status of that transaction.
The database that will be used as the transaction manager database is
determined at the database client by the database manager configuration
parameter tm_database (see "Transaction Manager Database Name (tm_database)"). Consider the following factors when setting this configuration
parameter:
- The transaction manager database can be:
- Another DB2 database.
- A DB2 for OS/390 Version 5 or later database.
- The transaction manager database can be any database.
- Catalog databases and nodes to allow the following:
- All database manager instances participating in a distributed transaction
must be able to connect to the transaction manager database that was specified
by the client's tm_database configuration parameter. An
instance participates in a distributed transaction if the transaction connects
to one or more databases contained in that instance. If, for example, the
tm_database parameter is set to DB2TRMGR at the database
client, you should be able to issue the following command from each
participating instance:
CONNECT TO DB2TRMGR
The result of this command should connect you to the same database, on
the same node from every participating instance, as well as the database
client.
- The database manager instance containing the transaction manager database
must be able to connect to all other databases participating in the
distributed transaction. If, for example, the client connects to the
SAVINGS_DB, CHECKING_DB and FEE_DB, the instance containing the transaction
manager database must also be able to connect to those databases using the
same names or aliases that the database client uses.
| Note: | The transaction manager database must not be cataloged using the alias option
to specify an alternate name.
|
- If the keyword 1ST_CONN is defined for the
tm_database parameter, the first database to which the application
connects in the transaction will be used as the transaction manager database.
In this case, all databases used in any transaction initiated from the
database client must be able to connect to one another using the same database
aliases as are used at the database client. This effectively means that each
database within a network must have a unique alias across the network.
Care must be taken when using 1ST_CONN and you should only use
this configuration if it is easy to maintain, for example, in the following
situations:
- The database client initiating the transaction is in the same instance
that contains the participating databases, including the transaction manager
database
- You are using DCE directory services to catalog and manage access to your
databases.
Note that if your application attempts to disconnect from the database
being used as the transaction manager database, you will receive a warning
message and the connection will be held until the unit of work is committed.
The above rules regarding cataloging of aliases affect your ability to
recover from problems (see "Recovering from Problems During Two-Phase Commit").
[ Top of Page | Previous Page | Next Page | Table of Contents | Index ]
[ DB2 List of Books |
Search the DB2 Books ]


