Replication Guide and Reference
To define a replication source, use the Control Center Object Tree to
navigate to the Tables folder. The
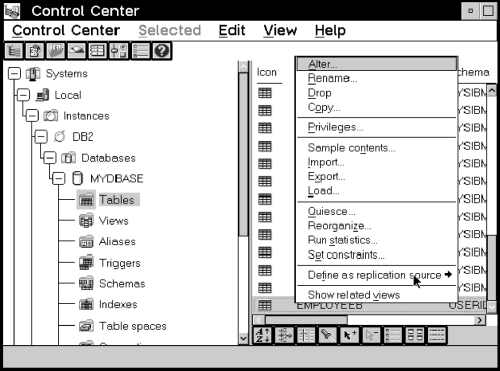
Define as replication source pop-up menu choice allows you to define a table object as a
replication source. Figure 17 shows the pop-up menu for the table object and the Define as
replication source menu choice.
Figure 17. The Table object pop-up menu. The Table object pop-up menu contains the Define as Replication Source menu action.

You can define replication sources using the Quick or
Custom pop-up menu choices. Quick allows you to define a
replication source using the defaults set in place. Custom allows
you to customize the defaults, such as specifying any columns that should not
be captured for update replication.
When you finish defining the source, you can select whether to run the SQL
that defines the source, or defer and run the file later. When you run the SQL
file to define the source, an object is created in the Replication
Sources folder. The table can now be defined in a subscription set.
For data restrictions when defining replication sources and targets, see "Data Restrictions".
Use the Define as Replication Source -> Quick menu choice,
available from a table object on the right side (contents pane) of the Control
Center, to define tables as sources for replication using the default
values.
To define a default replication source with the Quick menu
choice:
- Check the default settings in the Tools Settings notebook on the
Replication page. See "Setting Replication Preferences in the DB2 Tools Settings Notebook" for a list of the setting defaults and instructions for opening the notebook
and change the settings.
Additional default values can be changed only by using the
Custom menu choice and selecting choices on the Define as
Replication Source window.
- All source columns are available for data capture.
- Partition key columns are captured as UPDATE statements by the Capture
program.
- If the source table will be used in update-anywhere replication, conflict
detection is none.
If these default values are not acceptable for your application, go to "Defining a Custom Replication Source".
- In the Control Center, navigate to the Tables folder in the
source database and select it. The tables in the source database are displayed
on the right side of the window contents pane.
- From the contents pane, click mouse button 2 on the source table icon and
select the Define as Replication Source -> Quick menu choice to
launch the definition of the source. The Run Now or Save SQL window opens.
Specify whether to submit the replication request now or save the SQL
statements generated by the action in a file to be run later. See "Customizing and Running Replication SQL Files" to learn how to submit the request now or later.
- After you submit the request, verify that the replication source was
created by selecting the Replication Sources folder in the object
tree and selecting the Refresh menu choice.
- To begin capturing changes to the source table, start or reinitialize the
Capture program from the command processor window. See the Capture and Apply
chapter for your platform in this book for more information about the Capture
program.
Use the Define as Replication Source window to identify tables that are
available as sources for replication.
To define a custom replication source with the Custom menu
choice:
- Check the default settings in the Tools Settings notebook on the
Replication page. See "Setting Replication Preferences in the DB2 Tools Settings Notebook" for a list of the settings defaults and to learn how to open the notebook
and change the settings.
- In the Control Center, navigate to the Tables folder in the
source database and select it. The tables in the source database are displayed
on the right side of the window contents pane.
- From the contents pane, click mouse button 2 on the source table icon and
select Define as Replication Source -> Custom to open the Define as
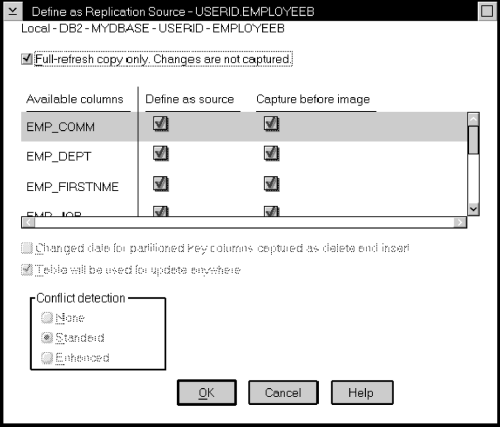
Replication Source window, as shown in Figure 18.
Figure 18. The Define as Replication Source window. The Define as Replication Source window is used to define replication sources.

- If you want to specify that the Capture program will not capture changes
to the source table and that the source data will be available for refresh
copying, select the Full-refresh copy only check box.
- If you want to make a column unavailable for replication, clear the
Define as source check box for that column. When cleared, the
column name becomes unavailable as a source column while defining a
replication subscription and cannot be replicated.
This check box is automatically selected if the Table will be used for
update anywhere check box is selected.
- If you do not want to capture the before image of a column, clear the
Capture before image check box for that column. The after image is
always replicated.
This check box is selected automatically when the Table will be used
for update anywhere check box is selected.
- If you want support for logical partition keys, select the Changed
data for partitioned key columns captured as delete and insert check
box. The Capture program treats updates to primary key columns as INSERT and
DELETE statements, rather than UPDATE statements.
- If the source table might be used for update-anywhere replication:
- Select the Table will be used for update anywhere check box.
When you select this check box, the Conflict detection choices
are enabled. If you do not select the Table will be used for update
anywhere check box, the conflict detection level default is None.
- Select a level of conflict detection.
- None
- Select None if you do not want any conflict detection.
| Attention: | Conflicting updates between the origin table and the replica will
not be detected.
|
- Standard
- Select Standard if you want moderate conflict detection in
which the Apply program searches rows already captured in the replica's
change data tables for conflicts. Standard detection is the default value.
- Enhanced
- Select Enhanced for conflict detection that guarantees data
integrity among all replicas and the origin table. The Apply program locks all
replicas in the subscription set against further transactions, and begins
detection after all changes prior to the locking have been captured.
See "Conflict Detection" for more information about conflict detection.
- Select OK to save the values and close the window. The Run Now
or Save SQL window opens. Specify whether to submit the replication request
now or save the SQL statements generated by the action in a file to be run
later. See "Customizing and Running Replication SQL Files" to learn how to submit the request now or later.
- After you submit the request, verify that the replication source was
created by selecting the Replication Sources folder in the object
tree and selecting the Refresh menu choice.
- To begin capturing changes to the source table, start or reinitialize the
Capture program from the command processor window. See the Capture and Apply
chapter for your platform in this book for more information about the Capture
program.
[ Top of Page | Previous Page | Next Page | Table of Contents | Index ]
[ DB2 List of Books |
Search the DB2 Books ]


