Replication Guide and Reference
Use the Define Subscription window to set up sources and targets to define
a basic replication subscription. See "Navigating to Your Replication Objects with the Control Center" to learn how to navigate to the Replication Sources folder. Many
of the fields in the Define Subscription window accept both ordinary and
delimited identifiers. These fields are identified in the step. See "Ordinary and Delimited Identifiers" for more information.
To define a replication subscription:
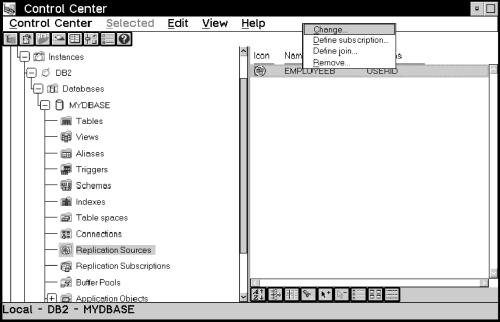
- Select the Replication Sources folder from the Control Center
as shown in Figure 20. The replication sources appear in the contents pane.
Figure 20. The Replication Sources Folder with Objects and Actions
- Select one or more replication sources you want to define as sources for
the replication subscription, and select
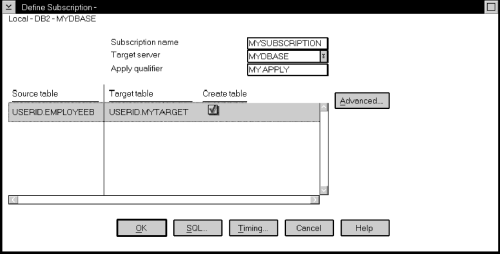
Define subscription from the pop-up menu. The Define Subscription window opens, as
shown in Figure 21.
Figure 21. The Define Subscription Window
- Type a name for the replication subscription in the Subscription
name field. The name can be up to 18 bytes in length and can be an
ordinary or delimited identifier; for example, MYSUBSCRIPTION.
- Specify the database where the target tables will reside in the
Target server field. The displayed default is the alias of the
source server. This value can be an ordinary or delimited identifier; for
example, MYDBASE.
- Specify a character string associating this replication subscription with
a unique instance of the Apply program in the Apply qualifier
field. This value can be an ordinary or delimited identifier and must be in
uppercase; for example, MYAPPLY.
- If you want to change the name of the target table, click on and then type
over the name in the Target table field. You can repeat this step
for each target table in the list box. This value can be an ordinary or
delimited identifier.
- Specify whether to create the target table by selecting the Create
table check box for every target table that you want to create when you
subscribe.
See "Defining a Replication Subscription with a User-Defined Target Table" for more information about this option.
- If you want to customize the target table structure, enhance any data, or
specify the timing for the replication subscription, go to "Defining Replication Sources: Advanced Tasks".
- Complete the subscription definition.
- Click on OK to save the values and close the window. The
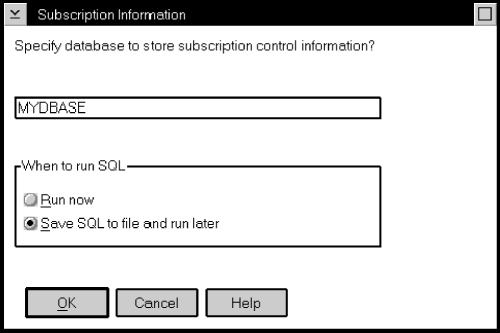
Subscription Information window opens as shown in Figure 22.
Figure 22. The Subscription Information Window. Use this window to enter the control server name and specify whether to run now or save the SQL to a file

- To specify the control server database, enter the database name in the
Specify database to store subscription control information field.
| Attention: | You can specify an Apply qualifier for the control server while defining the
first replication subscription that uses the control server. This value cannot
be changed. See "The Control Server" for more information about the Apply qualifier and the control server and
how to identify them.
|
- Specify whether to submit the replication request now or save the SQL
statements generated by the action in a file to be run later.
- After you submit the request, verify that the replication subscription was
created by selecting the Replication Subscription folder in the
object tree and selecting the Refresh menu choice.
- If you defined an event to start the Apply program, populate the event
table. See the "Scheduling Subscriptions with the Event Table" section in the
Capture and Apply chapter for your platform in this book.
- To begin replicating data to the target tables, start the Apply program
from the command processor window using the name of the control server you
specified on the Subscription Information window. See the Capture and Apply
chapter for your platform to learn more about the Apply program.
[ Top of Page | Previous Page | Next Page | Table of Contents | Index ]
[ DB2 List of Books |
Search the DB2 Books ]


