IBM Books

Installing and Configuring DB2 Clients


Chapter 5. Installing DB2 Clients on Windows 3.x Workstations


note

If you are planning to support only local communications from a WIN-OS/2 session to an OS/2 server, it is recommended that you use the local Windows Support supplied with the DB2 for OS/2 server, and do not install the Windows 3.x Client Application Enabler. Refer to the Quick Beginnings for OS/2 manual to install Windows support on your OS/2 server.

Note:If you have a previous version of the DB2 Client Application Enabler for Windows 3.1 installed on your system, it is recommended that you back it up before beginning this installation procedure.
To install the DB2 Client Application Enabler or the DB2 Software Developer's Kit on Windows 3.x workstations:

  1. Insert the appropriate CD-ROM into the drive:

  2. To begin the installation program enter:
    x:\db2\windows\language\install\install.exe
    

    where x: is the letter representing your CD-ROM drive and where language is the two-character country code that represents your language (for example, EN for English). Table 24 lists the code for each available language.

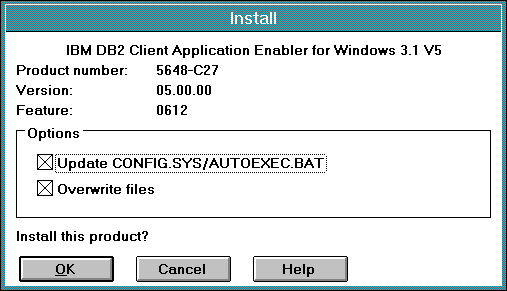
    The Install window opens.

    * Figure sqlr6cip not displayed.

  3. In the Install window, indicate whether or not you want to update the autoexec.bat file as part of the installation.

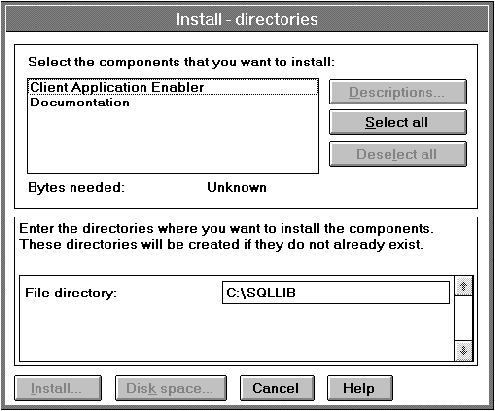
  4. Click on OK to continue. The Install-directories window opens.
    * Figure sqlrwcip not displayed.

  5. In the File directory field, type the directory where you want the product installed. The default value is c:\sqllib.

    note

    If you are installing the DB2 Client Application Enabler for Windows 3.x on an OS/2 system that already has the DB2 Client Application Enabler for OS/2 Version 5 product installed, enter the same directory in the File directory field as the DB2 Client Application Enabler for OS/2 product. This will merge the two DB2 directories together, allowing tools like the Client Configuration Assistant to be used to configure clients to access a remote DB2 database for both Windows 3.x and OS/2 applications.

  6. Select the components that you want to install.

  7. Click on the Install push button to start the installation. A progress window appears until the installation is complete.

    You can click on the Stop push button at any time to end the installation.

  8. Once you have completed the installation, shut down and reboot your system.


note

To configure your client to access a remote DB2 server, see Chapter 10. "Configuring Client-to-Server Communications Using the Command Line Processor".


[ Top of Page | Previous Page | Next Page | Table of Contents | Index ]

[ DB2 List of Books | Search the DB2 Books ]