
This step is not required on AIX.

To install the DB2 Client Application Enabler or the DB2 Software Developer's Kit on AIX, HP-UX and Solaris systems, you will perform the following steps:
To run DB2 Client Application Enabler or the DB2 Software Developer's
Kit for UNIX systems, you may have to update some kernel configuration
parameters.
|
|
This step is not required on AIX.
|
The following values in Table 5 are recommended for the HP-UX kernel configuration parameters.
Table 5. HP-UX Kernel Configuration Parameters (Recommended Values)
| Kernel Parameter | Recommended Value |
|---|---|
msgseg msgmnb msgmax msgssz |
8192 65535 (1) 65535 (1) 16 |
Notes:
To change the values, do the following:
 |
Go to "Step 2. Mounting the DB2 Client Pack CD-ROM" to continue with the installation.
|
The following values in Table 6 are recommended for Solaris kernel configuration parameters.
Table 6. Solaris Kernel Configuration Parameters (Recommended Values)
| Kernel Parameter | Recommended Value |
|---|---|
msgsys:msginfo_msgmax msgsys:msginfo_msgmnb msgsys:msginfo_msgseg msgsys:msginfo_msgssz |
65535 (1) 65535 (1) 8192 16 |
Notes:
To set a kernel parameter, add a line at the end of the /etc/system file as follows:
set parameter-name = value
For example, to set the value of parameter msgsys:msginfo_msgmax, add the following line to the end of the /etc/system file:
set msgsys:msginfo_msgmax = 65535
After changing the kernel parameters, reboot the system so that the changes can take effect.
To install DB2 Client Application Enabler or the DB2 Software Developer's Kit using the DB2 Installer, you must first mount the CD-ROM. Use either the SDK Pack CD-ROM (to install the DB2 Software Developer's Kit) or the Client Pack CD-ROM to perform the installation. Once you have mounted the CD-ROM, you can start installing the DB2 products.
Perform the following steps to mount the CD-ROM on AIX operating systems:
mkdir -p /cdrom
|
|
The directory name /cdrom is used here as an example only. You may
use a different name for your root directory.
|
smit storage
|
|
Device names for CD-ROM file systems must be unique. You may
need to delete a previously-defined CD-ROM file system or use another
name for your directory, if there is a duplicate device name.
|
/cdrom
smit mountfs
|
|
Go to "Step 3. Performing the Installation" to continue with the installation.
|
Perform the following steps to mount the CD-ROM on HP-UX operating systems:
    mkdir /cdrom
    /usr/sbin/mount /dev/dsk/c0t2d0 /cdrom
where /cdrom is the CD-ROM mount directory.
|
|
Go to "Step 3. Performing the Installation" to continue with the installation.
|
Perform the following steps to mount the CD-ROM on Solaris operating systems:
If the Volume Manager (vold) is installed on your system, the CD-ROM is automatically mounted as:
/cdrom/unnamed_cdrom
where /cdrom/unnamed_cdrom is the CD-ROM mount directory.
If the Volume Manager is not installed on your system, mount the CD-ROM by entering commands as shown in the following example:
   mkdir -p /cdrom/unnamed_cdrom
   mount -F hsfs -o ro /dev/dsk/c0t6d0s2 /cdrom/unnamed_cdrom
After you mount the CD-ROM file system, use the DB2
Installer to install the DB2 products.
|
|
If you are installing the DB2 Client Application Enabler from a remote
server, it is better to open a telnet session instead using the
rlogin command to connect to your remote server.
|
cd /cdrom/db2/aix
cd /cdrom/db2/hpux
cd /cdrom/unnamed_cdrom/db2/solaris
./db2setup
|
|
It will take some time for the DB2 Installer to start up, as it is scanning
your system for information.
|
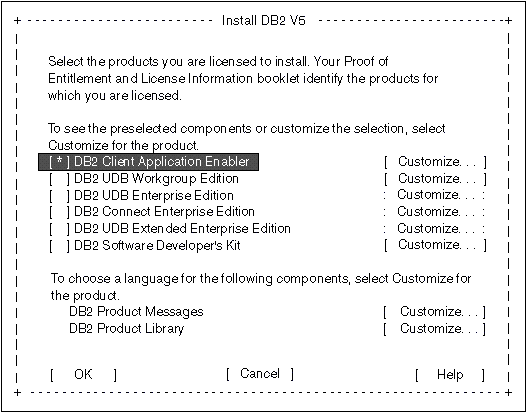
To display the required and optional components for the product you want to install, select Customize. The optional components that are most typically used are pre-selected for you.
When you have finished selecting the product components to install, select
OK to go to the Create DB2 Services screen. To undo any
selections you made, select Cancel.
|
|
Go to step 10 if you do not want to create a DB2 Instance at this time.
|
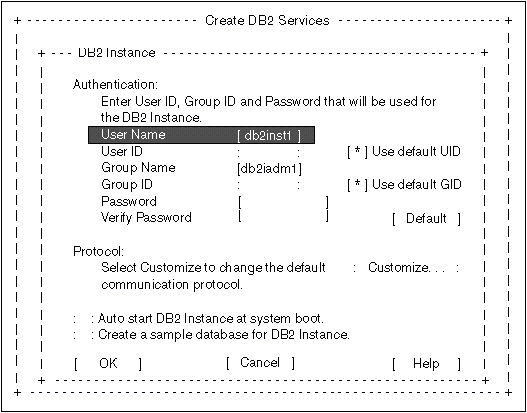
You can use the default values displayed at the DB2 Instance screen or change them. To change the default User ID for the instance, deselect Use Default UID and enter a new value for the User ID.
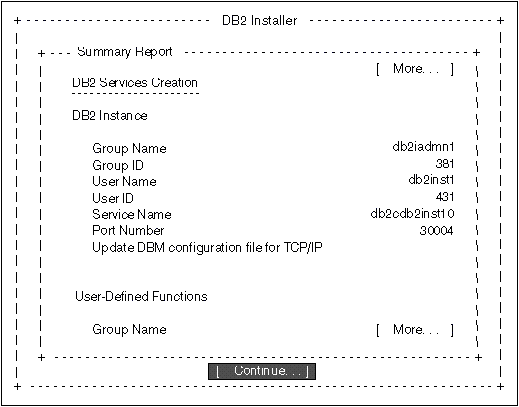
After the installation is complete, the software is installed in the DB2DIR
directory,
| where | DB2DIR | = /usr/lpp/db2_05_00 | on AIX |
|
|
| = /opt/IBMdb2/V5.0 | on HP-UX or Solaris |
|
| Proceed either to Chapter 9. "Configuring Client to DB2 Server Communications Using the CCA" or "Installing on Other UNIX Systems". |