
On clients, this username will be removed from the system when the
installation is complete.

To install DB2 products for Windows 95 or Windows NT, from a code server hard disk or CD-ROM to local or remote workstations, perform the steps in the following sections:
You can also use this procedure to perform an interactive remote install instead of an unattended remote one. Follow the instructions below.
Read and perform the steps in this section before you begin the installation to ensure that you have the required items and information you will need.
This section describes usernames required to install the DB2 product and its components.
A valid DB2 username is eight characters or less, and complies with DB2's naming rules. For more information on DB2's naming rules, see Appendix C. "Naming Rules".
A valid DB2 username is eight characters or less, and complies with DB2's naming rules. For more information on DB2's naming rules, see Appendix C. "Naming Rules".
If this username does not comply with DB2's naming rules, but has the "Act as part of the operating system" advanced user right, the setup program will create the username DB2ADMIN to perform the installation.
|
|
On clients, this username will be removed from the system when the
installation is complete.
|
To make the DB2 install files accessible to the machine where DB2 will be installed:
The command syntax is:
for:
where:
If performing a remote installation, you must enable your network clients to access the DB2 install files.
Grant shared access to the directory that you just created, or to the CD-ROM drive.
To set up a share:
On Windows 95, you do not need to specify type of access when you set up a share. By default, everyone is allowed read access.
In our example scenario, q:\db2prods uses a share name of db2nt. We will use this value in the examples that follow.
During an interactive installation, you provide the information needed to install DB2 and configure its environment. During an unattended installation, this information is provided as keywords and values in a response file. DB2's install package includes a number of ready-to-use sample response files, with default entries already in place.
The sample response files are located in:
for:
where x is the letter that designates the CD-ROM drive.
There is a different response file for each product on the CD, so that the
user has a valid list of parameters for each product.
 | If you intend to use the sample response file provided, without making any changes to its values, you can skip this step and go to "Step 3. Run Setup from the Workstation". |
Edit the sample response file using your favorite editor. For example, you can use Notepad or WordPad.
|
|
For more information on:
|
An example section of a response file appears below:
...
FILE               = c:\sqllib
REBOOT             = No
*COMP              = Control Center
...
Keywords unique to installation are parameters that are only specified in a response file during an unattended installation. The following is a list of keywords unique to installation for Windows 95 and Windows NT unattended installation:
Specifies the destination directory for DB2.
| Note: | Check the value for the FILE keyword. FILE specifies where to install the product. If you do not change this value, it defaults to x:\sqllib where x is the drive on which your operating system is installed. |
Specifies whether to reboot the system following installation.
Specifies the type of install. The options are:
For 0 and 1 (compact and typical), any COMP value will be ignored.
For all types, default communication values will be used where applicable, as follows:
   DB2.DB2NBADAPTERS
   DB2.NNAME
   DB2.PORTNUMBER
   DB2.SVCENAME
   DB2.FILESERVER
   DB2.OBJECTNAME
   DB2.IPX_SOCKET
DB2.TPNAME
| Note: | You may override these values; however, if the associated protocol has not been detected or specified, the values will not be used. |
Specifies the product you want installed. The options are:
| Note: | This parameter can be used more than once. |
Specifies the components you want installed. Components required for a product are installed automatically. Components that are not available are ignored.
| Note: | Component selections have no effect unless you specify a custom installation. |
The following table lists COMP keywords and the components they
represent.
Table 22. Component Keywords for Windows 95 and Windows NT Unattended Install
| Keyword | Component |
|---|---|
| Product Components | |
| GRAPHICAL_TOOLS | Graphical Tools |
| CLIENT_CONFIGURATION_ASSISTANT | Client Configuration Assistant |
| CONTROL_CENTER | Control Center |
| PERFORMANCE_MONITOR | Performance Monitor |
| VISUAL_EXPLAIN | Visual Explain |
| ODBC-DRIVER | DB2 ODBC Driver |
| SAMPLE_APPLICATIONS | Sample Applications |
| CONNECT_SUPPORT | Connect Support |
| SNA_SUPPORT | Integrated SNA Support |
| JAPANESE_CONVERSION | Japanese Conversion Support |
| KOREAN_CONVERSION | Korean Conversion Support |
| T_CHINESE_CONVERSION | Traditional Chinese Conversion Support |
| S_CHINESE_CONVERSION | Simplified Chinese Conversion Support |
| DB2 Books | |
| API_REFERENCE | API Reference |
| ADMINISTRATION_GUIDE | Administration Guide |
| ADMINISTRATION_GETTING_STARTED | Administration Getting Started |
| DB2_PROGRAMMING_GETTING_STARTED | Road Map to DB2 Programming |
| BUILDING_OS2_WIN_APPLICATIONS | Building Applications for Windows and OS/2 Environments |
| CLI_GUIDE_REFERENCE | CLI Guide and Reference |
| COMMAND_REFERENCE | Command Reference |
| CONNECT_PERSONAL_QUICK | DB2 Connect Personal Edition Quick Beginnings |
| CONNECT_USERS_GUIDE | DB2 Connect User's Guide |
| UNIVERSAL_DB_QUICK | DB2 Universal Database Quick Beginnings |
| SQL_PROGRAMMING_GUIDE | Embedded SQL Programming Guide |
| GLOSSARY | Glossary |
| MASTER_INDEX | Master Index |
| MESSAGES_REFERENCE | Message Reference |
| SQL_GETTING_STARTED | SQL Getting Started |
| SQL_REFERENCE | SQL Reference |
| SYSTEM_MONITOR_GUIDE | System Monitor Guide and Reference |
| CONNECT_ENTERPRISE_QUICK | DB2 Connect Enterprise Edition Quick Beginnings |
| TROUBLE_SHOOTING_GUIDE | Troubleshooting Guide |
| CONNECTIVITY_SUPPLEMENT | DB2 Connectivity Supplement |
| UNIVERSAL_DB_PERSONAL_QUICK | DB2 Universal Database Personal Edition Quick Beginnings |
| REPLICATION-GUIDE | Replication Guide and Reference |
| INSTALLING_CONFIGURING_CLIENTS | Installing and Configuring DB2 Clients |
Specifies whether or not to automatically start the Control Center each time the system is rebooted.
| Note: | By default the Control Center will be automatically started unless this parameter is set to NO. |
Specifies whether or not to automatically start the Client Configuration Assistant each time the system is rebooted.
| Note: | By default the Client Configuration Assistant will be automatically started unless this parameter is set to NO. |
|
|
|
If you are installing directly from the CD-ROM, you must store the renamed response file on another drive.
To perform the installation:
net use e: \\machine\directory
where:
For example, type:
net use e: \\codeserv\db2nt
Based on the example set up in previous steps, this points to q:\db2prods on the code server.
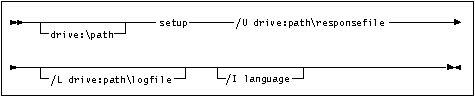
Specify the fully qualified path to invoke the program. For example:
e:\setup /U d:\db2\common\db2setup.rsp /L db2log.log /I language
where:
If you do not specify the log file's name, DB2 names it db2.log, and stores it in a directory called db2log, on the drive on which your operating system is installed.
If you do not specify the language, setup will determine the system language, and launch the appropriate DB2 install for that language.
| Note: | If you specified REBOOT=yes in your response file, the workstation will reboot automatically. |
|
| To configure your client to access remote servers, go to Chapter 9. "Configuring Client to DB2 Server Communications Using the CCA". |