Administration Getting Started
The Control Center contains tools for performing common
database administration tasks. It provides seamless integration of the DB2 administration tools,
gives you a clear view of all managed systems, lets you manage databases
remotely, and provides step-by-step assistance for some tasks.
This section covers the following topics:
- Opening the Control Center
- Displaying all the systems to which yours is connected
- Creating a basic database
- Creating and working with objects below the database level
To open the Control Center:
- From the desktop, open the DB2 product folder. Depending on the
system you are running, for example the Windows NT operating system, it could
be called DB2 for Windows NT. On systems running the Windows NT 4.0 and Windows 95 operating
systems, it is found in the Start menu.
- Open the Server Administration folder. (You do not
perform this step on systems running the Windows NT 3.51 operating
system.)
- Double-click on the Control Center icon. The Control Center
opens.
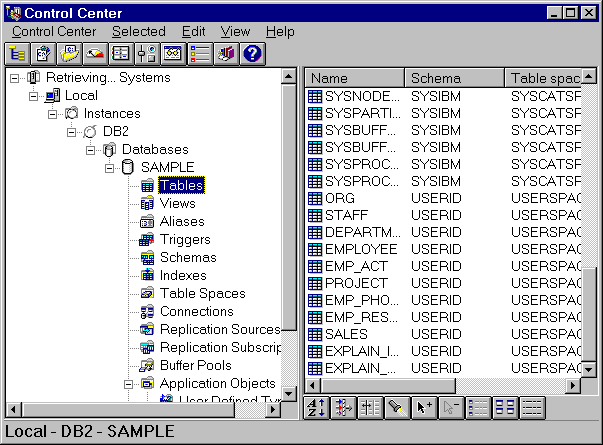
Figure 1. DB2 Control Center
The interface of the Control Center contains the following
features:
- The left side of the window is called the object tree. It displays icons
representing servers and database objects such as tables and views and their
relationships. You can expand and collapse the object tree.
-
The right side of the window is called the contents pane. When you open an
object folder in the object tree, specific objects are displayed here.
- The menu bar along the top of the window lets you access Control Center
functions and online help.
Figure 2. Control Center Menu Bar
Menu items under Control Center include actions that
affect the entire Control Center. (The Control Center menu changes dynamically if you open
a new Control Center.) Menu items under Selected dynamically change to include
only those actions that apply to selected objects in the contents pane. Menu
items under Edit include actions that let you work with objects in
the contents pane. Menu items under View include those that let you
customize the display of objects in the contents pane, and invoke some windows
such as the Journal and the Alert Center. Menu items under Help
include actions to display online help information and the features of the
online help information.
- The toolbar located above the object tree contains icons that let
you access Control Center functions such as creating and working with scripts,
executing commands, viewing job status, logs, and messages, and setting
preferences and alerts.
These functions can also be selected in the
View menu. Hover help
provides a short description for each icon. (When you move your mouse pointer over an area of an icon, and
pause, the brief description that appears is called hover help.)
Figure 3. Control Center Toolbar
- The toolbar located below the contents pane contains icons that let
you tailor the view of objects and information in the contents pane to suit
your needs.
These toolbar functions can also be selected from the
View
menu. A toolbar and menu items similar to the View menu are
seen throughout the DB2 administration tools when you work with lists. Hover help provides a short description for each icon.
Figure 4. Control Center Contents Pane Toolbar
At any time, you can set preferences for the DB2 administration tools by
clicking on the Tools Settings icon in the toolbar or the menu
choice in the View menu to open the Tools Settings
notebook.
To display all of the systems that your system is connected to and which
have DB2 installed:
- Expand the object tree by clicking on the plus sign (+) beside
Systems. Icons representing the actual local machine and any remote machines
are displayed.
(Your local system is represented by the icon labelled
Local. It appears only if the local machine is a DB2 server. If you click with mouse button 2 on the Local icon, one
of the options in the pop-up menu is called Connect to administration
server. The Administration Server lets you take advantage of functions
such as performance monitoring and scheduling. It is used as a service by the
DB2 Administration Tools to satisfy operating system requests and it is
automatically created and started for you (its default name is
DB2DAS00).)
- Expand the Local icon. The instance of DB2 on the local machine is displayed in a tree
structure.
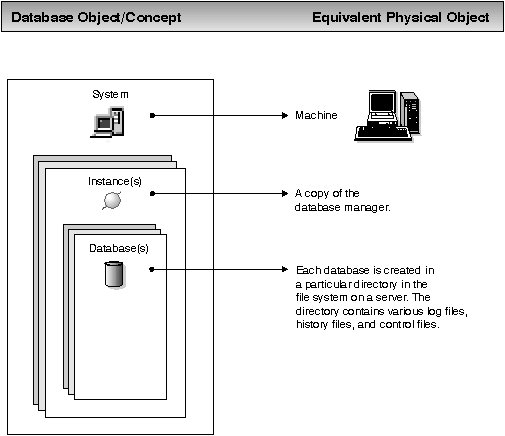
Each copy of the database manager code can be thought of as a
separate instance, and is stored in a directory on your machine.
The database manager is DB2 code that manages data. A default local instance
is created when you install DB2. In this book you will create and work with a
single database under the default instance.
(You can have several instances on a single system. You can use these instances to separate the development environment
from the production environment, or to restrict sensitive information to a particular group of
people. You can also tune an instance for a particular environment.)
- Expand the Instances icon. For each database that exists,
an icon and the name are displayed.
A relational database is a collection of data that is stored in
tables. Database objects such as views and indexes are provided to help manage
the data. For each database, an entry exists in the Database Directory file.
Figure 5 illustrates the concepts described in this section.
Figure 5. Database Logical View and Equivalent Physical View
To quickly create a basic database:
- Click mouse button 2 on the Databases icon and select
Create -> New from the pop-up menu.
(Mouse button 2 is the right mouse button on a right-handed
mouse.) The Create Database SmartGuide opens.
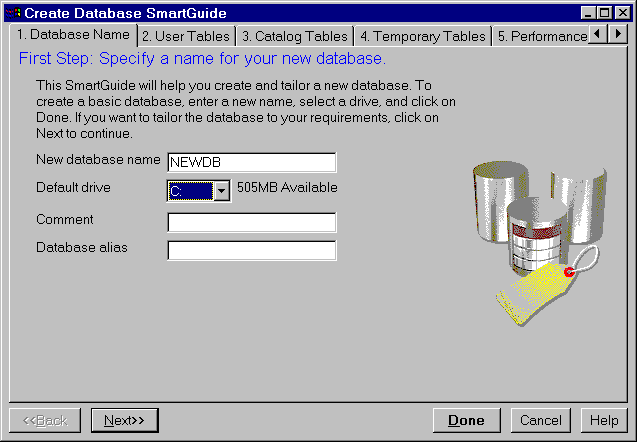
Figure 6. Create Database SmartGuide
- Enter a name for the database, select a drive, and click on
Done. If you do not enter an alias (local name), the database name
will be used as the alias.
Later you can use the Create Database SmartGuide again to create
other databases where you can:
- Allocate space for the database
- Specify basic storage performance characteristics
- Specify the locale for the correct selection of code pages for sorting and
code page conversion
More options exist for creating a database. For now, a simple
database is sufficient to illustrate how to use the Control Center.
To bring up a pop-up menu that shows all the actions you can perform
on a database, click on it with mouse button 2. Many of the actions are described in more detail in this book.
You can create and work with objects below the database level such as
tables, views, and indexes.
To create new objects:
- Expand the database icon of the database you just created. Object types are displayed as folder icons.
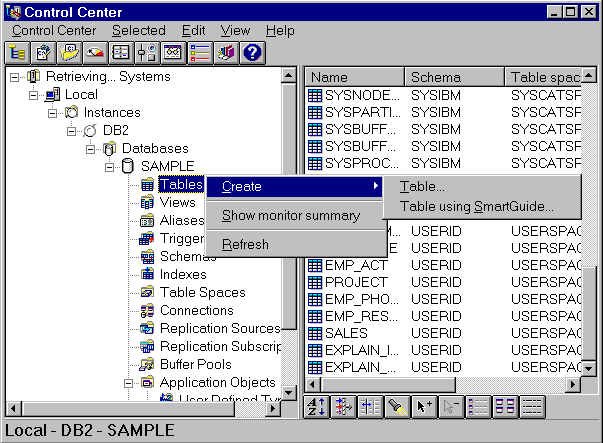
- Click mouse button 2 on a folder icon, such as Tables. The
pop-up menu is displayed.
Figure 7. Pop-up Menu for Tables
- Select Create. A Create window or Create SmartGuide opens, depending on the create
action you choose.
From the object tree, you can click on a folder icon such as
Tables. If any tables exist, they are displayed in the contents pane. You can then select a table in the contents pane and invoke an
action for it.
For more information about using the Control Center, go to its online help
(available from its Help menu or by pressing F1 anywhere in the
Control Center). For example, you will find instructions on:
- Opening a new Control Center
- Finding an object in the contents pane
The DB2 SmartGuides are part of the DB2 administration tools and step
you through the administration tasks. The following SmartGuides are
available:
- Create Database: Helps you create a database, assign storage, and
select basic performance options. To invoke it, click mouse button 2 on the Databases icon
in the Control Center, and select Create -> New.
- Create Table Space:
Helps you create a new table space and set basic storage performance
options. To invoke it, click mouse button 2 on the Table spaces
icon in the Control Center, and select Create -> Table space using
SmartGuide.
- Create Table:
Helps you design columns
(using pre-defined column templates if you wish), create a primary key for the table, and assign the table to one or
more table spaces. To invoke it, click mouse button 2 on the Tables
icon in the Control Center, and select Create -> Table using
SmartGuide.
- Backup Database:
Asks you basic questions about the data in the database, the
database's availability, downtime restrictions, and recoverability
requirements. It then suggests a backup plan, creates the job script, and
schedules it. To invoke it, click mouse button 2 on an icon representing one of
your databases in the Control Center, and select Backup -> Database using
SmartGuide.
- Restore Database:
Walks you through the process of recovering a database.
To invoke it, click mouse button 2 on an icon representing one of
your databases in the Control Center, and select Restore -> Database
using SmartGuide.
- Performance Configuration:
Asks you questions about the database, its data, and the purpose of the
system and then suggests new configuration parameters for the database and automatically applies them to the database if you wish. To invoke it, click mouse button 2 on an icon representing one of
your databases in the Control Center, then select Configure
performance.
[ Top of Page | Previous Page | Next Page | Table of Contents | Index ]
[ DB2 List of Books |
Search the DB2 Books ]


