Administration Getting Started
To tune a database to your requirements, use the Next
push button in the Create Database SmartGuide to progress through the pages of
the SmartGuide. You can specify:
- Space allocation for:
- A user space (for the tables that will contain data)
- The system catalog tables (described in "System Catalog Tables")
- Temporary space (required for things like sorting or reorganizing
tables, creating indexes, and joining tables)
- Basic storage performance characteristics which alter how the
database reads and writes data to the disk and optimize how the database uses
its available hard drives
- The locale (territory and code page set) which determines the set of
characters your database will use
The default user table space, USERSPACE1, is fine to use for simple
tables that you create for experimental purposes. However, you should create
your own table space for "real" tables.
To create a new table space:
- From the Control Center, click mouse button 2 on the Table
Spaces folder icon, and select Create -> Table space using
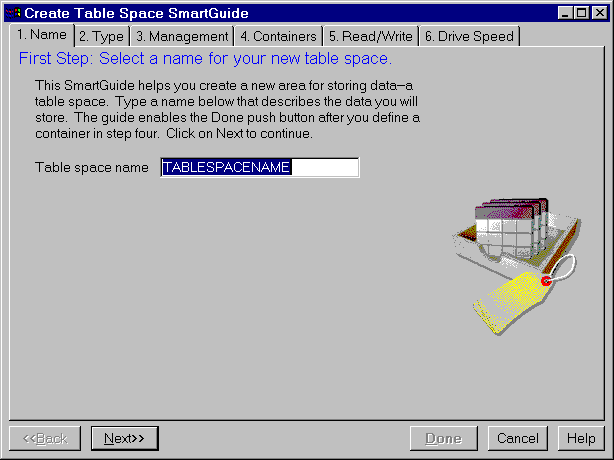
SmartGuide. The Create Table Space SmartGuide opens.
Figure 16. Create Table Space SmartGuide
- If you just need a basic table space:
- Enter a new name
- Define a container for the table space on the Containers
page of the SmartGuide.
- Click on the Done push button
- Optional: If you want to specify more details about the table
space, click on the Next or Back push buttons. For
example, you can choose:
- The type of data you will store in the table space on the
Type page of the SmartGuide
- The type of space management system on the Management
page of the SmartGuide
The SmartGuide will step you through panels that prompt you for
information. See the online help for explanations of all the choices.
From this point on, if you want a table to belong to a particular table
space, you must provide the name of that table space when you create the
table. For each table space, a row exists in the SYSCAT.TABLESPACES catalog
view. If you do not specify a table space, the table will be placed in the first table space that was created
(that is, the first one listed in SYSCAT.TABLESPACES). If you have not created any table spaces, the table will be placed
in the default table space (IBMDEFAULTGROUP, or a table space created by the
same user ID that is creating the table, or USERSPACE1, in that order). If
none of the default table spaces exist, table creation will fail.
The Administration Guide describes more advanced table space design considerations:
- Mapping tables to table spaces
- Choosing an extent size
- Deciding between an SMS or DMS table space
We suggest the following for setting up your disks, containers,
table spaces, and tables, and their relationships among each other. Note that the suggestions below reflect only one sample
implementation which allows you to add more containers later as your data
grows. Each disk is used as a raw device (unpartitioned drive). This suggested implementation may not apply to a large database
configuration.
- After you have installed the operating system, DB2, and any other
software, identify the unused disks (for example , three disks) that you want
to allocate to the database.
- For best I/O performance, make each container a separate device.
Define no more than 1 container per disk. For example, 5 containers on 5
separate disks will allow for efficient scanning of data.
- Create one table space for tables containing user data and their
indexes.
By default, the user, temporary, and system catalog tables belong to
separate table spaces. They are created on your default drive.
- Assign at least 3 containers to the table space for tables
containing user data. Assign at least 1 container to the table space for the
temporary tables, and at least 1 container to the table space for the system
catalog tables.
- Create all user tables in one table space.
This section describes how to access the Change Container window
from which you can create a container.
- From the Control Center, click mouse button 2 on the Table
Spaces folder icon, and select Create ->Table space using
SmartGuide. The Create Table Space SmartGuide opens.
- Click on the Management tab.
- Select Low maintenance to create an SMS container.
Select High performance to create a DMS container (file
or raw device).
An SMS container uses the file system's services to perform
I/O. The attributes of this method are:
- Easy management
- Space pre-allocation is not required
- Table space growth is possible by growing the data files up to the
limit of the file system
A DMS container bypasses the file system's services and
accesses the file or disk directly (this is often referred to as using raw
I/O). The attributes of this method are:
- High performance
- Space pre-allocation is required
- Table space growth is possible by adding new containers
In general, small personal databases are easiest to manage with SMS table
spaces. If you choose to use DMS table spaces with device containers, you must
be prepared to tune and administer your environment.
- Click on the Next push button so that you move to the
Containers page.
- Click on the Add push button. The Add Container window
opens. If you require assistance while creating a container, invoke the online
help.
[ Top of Page | Previous Page | Next Page | Table of Contents | Index ]
[ DB2 List of Books |
Search the DB2 Books ]

