

To set up a code server and install one or more thin clients which will access it, perform the steps in the following sections:
If you plan to install multiple thin clients in a row, perform all the steps for the first thin client, then perform only "Step 3. Make Thin Client Setup Program Accessible to the Target Workstation" and "Step 4. Install Thin Client on the Target Workstation" for each subsequent thin client on that code server.
Read and perform the steps in this section before you begin the installation to ensure that you have the required items and information you will need.
A valid DB2 username is eight characters or less, and complies with DB2's naming rules. For more information on DB2's naming rules, see Appendix C. "Naming Rules".
A valid DB2 username is eight characters or less, and complies with DB2's naming rules. For more information on DB2's naming rules, see Appendix C. "Naming Rules".
If this username does not comply with DB2's naming rules, but has the "Act as part of the operating system" advanced user right, the setup program will create the username DB2ADMIN to perform the installation.
| Note: | The above requirements apply to both the codeserver and the target thin client workstation. |
|
| This username will be removed from the system when the installation is complete. |
The Thin Client Installation program performs three types of actions that are subject to security restrictions:
This requires that the account you use to perform the DB2 installation be a Local Administrator (that is, a member of the local machines Administrator group). In addition, DB2 requires that your userid be 8 characters or less and meet its naming restrictions. If this is not the case, DB2 will attempt to create and use an account called DB2ADMIN (This account will be deleted after install).
Your account must be a member of the Administrators group on the Code Server machine. If you are a domain Administrator and the "Domain Administrators" group is a member of the code server's Administrator group then you will be able to access the registry. If not, your account (both userid and password) must be defined on the Code Server and that account must be part of the Administrator's group. In addition, if DB2 creates the Default userid of DB2ADMIN, this userid would have to be defined on the Code Server (password DB2ADMIN).
If this is NOT true then the install program will not be able to access the remote registry. As a result, the contents of your response file will not be verified and the registry on the local machine will be updated with default values. For most installations, this is not a problem.
It is recommended that you set up the LAN Share on the Code Server to provide everyone read access. In this case a userid and password is not required.
If a userid and password is provided it must be defined in the code server's security database. DB2 will set up a permanent net use for the user installing the thin client. If the password changes in the future, the NET USE information must be updated.
If you do not wish universal access and also do not wish to provide a userid and password to use to access the shared LAN drive, then the userid and password of the account used to install the thin client must be defined in the Code Server's security database.
Windows 95 has no notion of an Administrator. However, you must use an account that meets DB2's naming restrictions.
Windows 95 does not support the remote procedure call that must be performed to access the Code Server's registry. So the DB2 thin client installation will continue with default values.
Windows 95 does not support provision for supplying a userid and password for the LAN Connection. You must either allow Everyone to access the drive (for read) or the userid and password of the account used to install the thin client must be defined in the Code Server's security database.
See Chapter 4. "Installing DB2 Clients on Windows 95 or Windows NT Workstations" for complete instructions on installing DB2 Client Application Enabler on the code server machine. For the thin client feature, keep the following considerations in mind:
To set up a share:
On Windows 95, you do not need to specify type of access when you set up a share. By default, everyone is allowed read access.
In our example scenario, c:\codesrv uses a share name of db2nt. We will use this value in the examples that follow.
When you have done "Step 1. Install DB2 Client Application Enabler on the Code Server", the DB2 Client Application Enabler on the code server will contain the directory c:\codesrv\sqllib\thnsetup which will contain all files needed for the thin client setup, including the sample response file.
During an interactive installation, you provide the information needed to install DB2 and configure its environment. During an unattended installation, this information is provided in the form of keywords and values in a response file. DB2 Client Application Enabler installed on the code server includes a ready-to-use sample response file, db2thin.rsp, with default entries already in place. This information will be applied when you install a thin client.
|
|
You can create a different response file, and therefore a different
configuration, for each thin client installation. You can also edit and
resave the response file to create one or two or more "standard"
configurations, using the same ones as templates for multiple thin client
installations.
|
Edit the sample response file using your favorite editor. For example, you can use Notepad or WordPad.
|
|
For more information on
|
To activate an item in the response file, remove the asterisk (*) to the left of the keyword/environment variable, erase the current setting to the right of the value and type in a new setting. The possible settings are listed to the right of the current setting.
*REBOOT            = Yes, No
*TYPE              = 0,1,2 (0=compact,1=typical,2=custom)
*COMP              = Graphical Tools
*COMP              = Client Configuration Assistant
*COMP              = Control Center
*COMP              = Visual Explain
*COMP              = Performance Monitor
*COMP              = IBM DB2 ODBC Driver
*COMP              = Installing and Configuring DB2 Clients
*COMP              = Messages Reference
*USERNAME          = (userid that the security service will run under)
*PASSWORD          = (password for the security service id)
|
|
You will need to reboot the target workstation after installing. To
have this done automatically, activate the
REBOOT keyword.
|
The TYPE keyword specifies the type of install that you want.
|
|
On Windows NT, you should also specify a value for both USERNAME and, if applicable, PASSWORD. Specify a username that belongs to the local Administrator's group, is eight characters or less, and complies with DB2's naming rules. If the username that you specify does not meet DB2's naming rules, but
has the "Act as part of the operating system" advanced user right,
the setup program will create a temporary username (that belongs to the
Administrators group) called DB2ADMIN, with a password of
DB2ADMIN. The setup program will use this username to perform
the installation.
|
The following is a sample section of the environment variables contained within a response file:
*DB2BQTIME         = 1 -
*DB2BQTRY          = 0 -
*DB2CHKPTR         = ON, OFF
*DB2CODEPAGE       =
*DB2DBDFT          =
DB2INSTPROF        = C:\CFG
*DB2IQTIME         = 1 -
*DB2OPTIONS        =
...
|
| The only environment variable setting that must be specified within the response file is DB2INSTPROF. To set up a separate client configuration for each thin client, set the DB2INSTPROF value to a directory on the thin client workstation. To maintain one client configuration on the code server, set DB2INSTPROF to a directory on the code server workstation. |
The following is a sample section of the configuration parameters contained within a response file:
*DB2.DIAGLEVEL      = 0 - 4
*DB2.DIAGPATH       =
*DB2.DIR_CACHE      = YES, NO
*DB2.DIR_OBJNAME    =
*DB2.DIR_PATH_NAME  =
*DB2.DISCOVER       = DISABLE, KNOWN or SEARCH
...
This step gives the target workstation access to the thin client setup program, so that the thin client install can run. From the target workstation, perform one of the following:
net use x: \\machine\directory
where:
For example:
NET USE x: \\db2server\db2nt
This step installs the thin client code on the target workstation, and sets up the links to the code server.
| Note: | Make sure that the thin client setup program is available to the client machine. You can accomplish this by performing either of the methods detailed in "Step 3. Make Thin Client Setup Program Accessible to the Target Workstation". |
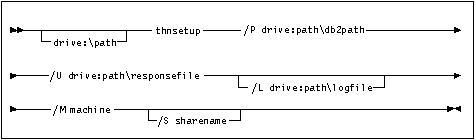
Specify the fully qualified path to invoke the program. For example:
   x:\sqllib\thnsetup\thnsetup /P x:\sqllib
      /U x:\sqllib\thnsetup\db2thin.rsp /L c:\logdir\db2log.txt
      /M \\db2server /S db2path
where:
If you do not specify the log file's name, DB2 names it db2.log, and stores it in a directory called db2log, on the drive on which your operating system is installed.
If this share requires a username and/or password, specify the share name as: sharename,userid,password.
If there is no password, type: sharename,userid.
If a username is not required, type: sharename only.
 | To configure the thin clients to access servers, go to Chapter 9. "Configuring Client to DB2 Server Communications Using the CCA". |