Administration Getting Started
Within any business, data often must adhere to certain restrictions
or rules. Restrictions may apply to single pieces of information, such as an
employee number; association of pieces of data, such as employee number and
department; or analysis of the impact of changing data, such as salary
increases.
DB2 provides constraints as a way to enforce those rules
using the database system. A constraint is a mechanism that ensures that
certain conditions relating columns and tables are maintained. For example, an employee number must be unique from person to
person and, as such, is under some constraint.
DB2 provides different kinds of constraints which are described
below. In this section you will create three of these
constraints:
- Unique constraint
- Primary key constraint
- Check constraint
- NOT NULL constraints
- NOT NULL constraints prevent null values from being entered into a column.
You can implement a NOT NULL constraint by selecting
Nullable on the Add Column window. You access the Add Column window
from the Create Table window.
- unique constraints
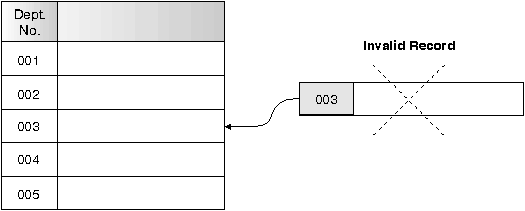
- Unique constraints ensure that the values in a set of columns are unique
and not null for all rows in the table. For example, a typical unique
constraint in a DEPARTMENT table might be that the department number is unique
and not null. The steps for creating a unique constraint are described in "Adding a Unique Constraint".
Figure 18. Unique Constraints Prevent Duplicate Data
The database manager enforces the constraint during insert and update
operations, ensuring data integrity.
- primary key constraint
- Each table can have one primary key. A primary key is a column or
combination of columns that has the same properties as a unique constraint.
You can use a primary key and foreign key constraints to define relationships
between tables.
Because the primary key is used to identify a row in a table, it should be
unique and have very few additions or deletions. A table cannot have more than
one primary key, but it can have multiple unique keys. Primary keys are
optional, and can be defined when a table is created or altered. They are also
beneficial in that they order the data when data is exported or reorganized.
Instructions for creating a primary key are described in "Defining a Primary Key on an Existing Table".
In the following tables, DEPTNO and EMPNO are the primary keys of the
DEPARTMENT and EMPLOYEE tables.
Table 1. DEPARTMENT Table
| DEPTNO (Primary Key)
| DEPTNAME
| MGRNO
|
| A00
| Spiffy Computer Service Division
| 000010
|
| B01
| Planning
| 000020
|
| C01
| Information Center
| 000030
|
| D11
| Manufacturing Systems
| 000060
|
Table 2. EMPLOYEE Table
| EMPNO (Primary Key)
| FIRSTNAME
| LASTNAME
| WORKDEPT (Foreign Key)
| PHONENO
|
000010
|
Christine
|
Haas
|
A00
|
3978
|
000030
|
Sally
|
Kwan
|
C01
|
4738
|
000060
|
Irving
|
Stern
|
D11
|
6423
|
000120
|
Sean
|
O'Connell
|
A00
|
2167
|
000140
|
Heather
|
Nicholls
|
C01
|
1793
|
000170
|
Masatoshi
|
Yoshimura
|
D11
|
2890
|
- foreign key constraints
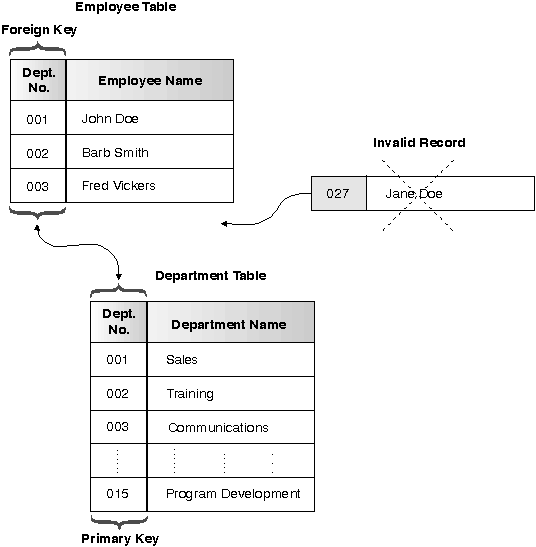
- Foreign key constraints (also known as referential integrity constraints)
enable you to define required relationships between and within tables.
For example, a typical foreign key constraint might state that every
employee in the EMPLOYEE table must be a member of an existing department as
defined in the DEPARTMENT table.
To establish this relationship, you would define the department number in
the EMPLOYEE table as the foreign key, and the department number in the
DEPARTMENT table as the primary key.
You can create a foreign key from the Foreign Keys page
of the Create Table notebook.
Figure 19. Foreign and Primary Key Constraints Define Relationships and Protect Data
- check constraints
- A check constraint is a rule in the database that specifies the values
allowed in one or more columns of every row of a table.
For example, in an EMPLOYEE table, you can define the Type of Job column to
be 'Sales', 'Manager', or 'Clerk'. With this
constraint, any record with a different value in the Type of Job column is not
valid and would be rejected, enforcing rules about the type of data allowed in
the table.
The steps for creating a check constraint are described in "Adding a Check Constraint".
When you create a unique key, a primary key, or a foreign key an
index is created. See "Index Considerations" for information on how indexes affect performance. See the Administration Guide for more information about constraints.
You can also use triggers in your database. Triggers are more
complex and potentially more powerful than constraints. They define a set of actions that are executed in conjunction with,
or triggered by, an INSERT, UPDATE, or DELETE clause on a specified base
table. You can use triggers to support general forms of integrity or business
rules. For example, a trigger can check a customer's credit limit before
an order is accepted, or be used in a banking application to raise an alert if
a withdrawal from an account did not fit a customer's standard withdrawal
patterns. See the Embedded SQL Programming Guide for more information on triggers.
To create a unique constraint you use the Create Index window and
create an index.
- Open the Create Index window:
- From the Control Center expand the object tree until you find the
Indexes folder.
- Click mouse button 2 on the Indexes folder and select
Create from the pop-up menu. The Create Index window opens.
- Use the Index schema list box to specify the schema for
the index you are creating.
- In the Index name field, type the name for the index you
are creating.
- Use the Table schema box to specify the schema for the
table on which the index is to be created.
- In the Table name field, type the lower-order
(unqualified) identifier for the table on which the index is to be
created.
- In the Available columns list box, select the column or
columns that you want to define as part of the index key.
- Click on the > push button to move the selected column
or columns to the Selected columns list box. The order in which the
columns appear in the Selected columns list box is the order in
which the index is created.
- Optional: Specify the order to place the index entries in by
clicking on the Ascending and Descending radio
buttons.
- Optional: Select the Unique check box to prevent
the table from containing two or more rows with the same value of the index
key.
Select the Unique check box to indicate that a table will
not contain two or more rows with the same value of the index key. The
constraint is enforced when rows of the table are updated or new rows are
inserted. The constraint is also checked during the execution of the CREATE
INDEX statement. If the table already contains rows with duplicate key values,
the index is not created.
When the Unique check box is selected, null values are
treated as any other values. For example, if the key is a single column that
can contain null values, that column can contain no more than one null
value.
- Optional: In the Comment field, document the index
that you are creating.
- Click on Ok to create the index.
It is recommended that you define a primary key at the time you
create a table as described in "Step 1. Creating a Table". It is also possible to add a primary key to an existing table.
You can choose multiple columns as the primary key. For example, you
might want to create a primary key on the "first name" and "last
name" columns of an employee's name to ensure uniqueness. A unique index is automatically created for the columns making up
the primary key.
To add a primary key to an existing table, use the Alter
action from the pop-up menu for that table.
You can add check constraints to an existing table and change or
remove existing ones. Or, you can create them when you first create a
table. To add new check constraints to an existing table:
- Open the Alter table notebook.
- From the Control Center, expand the object tree until you find the
Tables folder.
- Click on the Tables folder. Any existing tables are displayed
in the pane on the right side of the window (the contents pane).
- Click mouse button 2 on the table you want, and select Alter
from the pop-up menu. The Alter Table notebook opens.
- Click on the Check Constraints tab.
- Click on the Add push button. The Add Check
Constraint window opens.
- In the Check condition box, specify the check condition for the
constraint you are defining.
- Optional: In the Constraint name field, type a name
for the check constraint.
- Optional: In the Comment field, type a comment to
document the new check constraint.
- Click on Add to add the new check constraint.
- If you want to add another check constraint, fill in the Add Check
Constraint window again, and click on the Add push button. If not,
click on the Close push button.
- If you do not want to make any additional changes to the table, click on
OK to alter your table and close the Alter Table
notebook. Otherwise, you can continue on to one or more of the optional tasks
described in the online help.
A schema is an identifier, such as a user ID, that is
used to help group tables and other database objects. A schema can be owned by an individual, and the owner can control
access to the data and the objects within it.
A schema is also an object in the database. It may be created automatically when the first object in a schema is
created. The object can be any that can be qualified by a schema name such as
a table, index, view, package, distinct type, function, or trigger. You must
have IMPLICIT_SCHEMA authority to have the schema automatically created. Or,
you can create a schema explicitly.
A schema name is used as the first part of a two-part object
name. When an object is created you can assign it to a specific schema. If
you do not specify a schema, it is assigned to the default schema, whose name
is usually the user ID of the person who created the object. The second part
of the name is the name of the object. For example, a user named Smith might
have a table named SMITH.PAYROLL.
To access the Create Schema window so that you can create a schema
explicitly:
- From the Control Center, expand the object tree until you see the
Schemas folder under the database in which you want the schema to
reside.
- Click mouse button 2 on the Schemas folder, and select
Create from the pop-up menu. The Create Schema window opens.
- Click on the Help push button if you need help while
creating a schema.
[ Top of Page | Previous Page | Next Page | Table of Contents | Index ]
[ DB2 List of Books |
Search the DB2 Books ]


