
Figure 17. Create Table SmartGuide
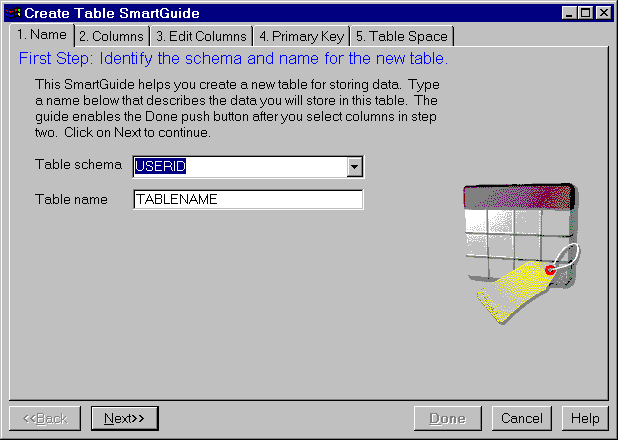 |
The SmartGuide steps you through the task of creating a table, including naming it, selecting, ordering, and editing columns, selecting table spaces, and selecting a primary key. It provides you with templates for columns which you can use as is or modify. The basic steps are described below. Click on Help at any time if you are unsure how to complete a step.
A schema provides a logical classification of objects in a database. When a table is created, it is assigned to a schema. See "Creating a Schema".
Before creating your own objects, you need to consider whether you want to assign them all to the default schema (identified by your user ID) or to a separate schema that logically groups them. In many cases, using a different schema name is very beneficial.
- Select a column list to see the available columns. Use the Edit Lists push buttons to change column defaults to add your own columns to the lists.
- Use the > push button to move an available column to the Columns to create list.
You can now either select Done, or continue on to edit the details of your selected columns with the Edit lists push button.
Choose the order in which you want the columns to appear when the data in the table is listed.
Although this step is optional, it is recommended that you define a primary key because table access is quicker if each row can be uniquely identified. A primary key is necessary in order to support updates from many ODBC applications. When you choose a column as the primary key, the database checks each new row for a unique value in that column, rejecting any duplicates. Primary keys are described in "Step 3. Enforcing Business Rules for Data". (To create a foreign key, use the Create Table or Alter Table window. You can invoke these windows by clicking with mouse button 2 on a table icon in the Control Center's object tree and selecting the appropriate action from the pop-up menu. Foreign keys are described in "Step 3. Enforcing Business Rules for Data".)
- Table space:
The easiest option here is to accept the default table space and continue. A common starting point is to store all your tables in one table space. But if this will be a large table, you may want to assign it a separate table space. If necessary, create a new one by clicking on Create to open the Create Table Space SmartGuide.
It is recommended that you create one table space for tables containing user data and their indexes. Create one table space for the temporary tables and one for the system catalog tables.
- Separate index space:
This option is not available until you assign a primary table space. Using a separate space for indexes can speed up access to the table. If you have a fast hard disk for which you want to create an index space, you can create and assign the space here. This separation may help make I/O more efficient.
- Separate long space:
This option is not available until you assign a primary table space. If this table will have a large amount of long or large object (LOB) data, you can increase the size limit from 64 gigabytes (GB) to 2 terabytes (TB) with a long table space here. There are performance benefits to separating long or LOB data from regular data.
The SmartGuide will also allow you to backup the long data separately. For example, if the long data is read-only or not accessed frequently, you might choose to back it up on a separate schedule or not at all.